
Deep Learning study
[Pytorch] GAN(Generative Adversarial Network)를 이용한 흑백 이미지 colorization(미완성..) 본문
[Pytorch] GAN(Generative Adversarial Network)를 이용한 흑백 이미지 colorization(미완성..)
HwaniL.choi 2018. 4. 5. 14:03Black & White 이미지를 Color 로 바꾸는 모델을 만들기 위해서 GAN 이라는 모델을 이용할 것이다.
사실 처음에는 그냥 단순한 ConvNet으로 해결하려 했지만 성능은 참담했다.
흑백이미지를 input으로 학습을 시켰을때, Color이미지를 만들어내는것이 아니라 원래 이미지보다 약간은 흐린 갈색 이미지가 나오게 되는 것 이였다.
그래서 찾다가 찾다가 , GAN 을 알게되고 공부해 보았다.
첫번째로 만들어낸 모델은
1 2 3 4 5 6 7 8 9 10 11 12 13 14 15 16 17 18 19 20 21 22 23 24 25 26 27 28 29 30 31 32 33 34 35 36 37 38 39 40 41 42 43 44 45 46 47 48 49 50 51 52 53 54 55 56 57 58 59 60 61 62 63 64 65 66 67 | class Generator(nn.Module): def __init__(self): super(Generator, self).__init__() self.encode = nn.Sequential( # 노이즈와 합쳐진 흑백 input # batch_size * (1+1) * 256 * 256 nn.Conv2d(2, 16, kernel_size = 3, stride = 1, padding = 1, bias = False), nn.BatchNorm2d(16), nn.ReLU(inplace = False), # batch_size * 16 * 256 * 256 nn.Conv2d(16, 32, kernel_size = 3, stride = 1, padding = 1, bias = False), nn.BatchNorm2d(32), nn.ReLU(inplace = False), nn.MaxPool2d(2), # batch_size * 32 * 128 * 128 nn.Conv2d(32, 64, kernel_size = 3, stride = 1, padding = 1, bias = False), nn.BatchNorm2d(64), nn.ReLU(inplace = False), nn.MaxPool2d(2), # batch_size * 64 * 64 * 64 nn.Conv2d(64, 128, kernel_size = 3, stride = 1, padding = 1, bias = False), nn.BatchNorm2d(128), nn.ReLU(inplace = False), # batch_size * 128 * 64 * 64 nn.Conv2d(128, 256, kernel_size = 3, stride = 1, padding = 1, bias = False), nn.BatchNorm2d(256), nn.ReLU(inplace = False), # batch_size * 256 * 64 * 64 nn.UpsamplingNearest2d(scale_factor=2), # batch_size * 256 * 128 * 128 nn.Conv2d(256, 128, kernel_size = 3, stride = 1, padding = 1, bias = False), nn.BatchNorm2d(128), nn.ReLU(inplace = False), # batch_size * 128 * 128 * 128 nn.UpsamplingNearest2d(scale_factor = 2), # batch_size * 128 * 256 * 256 nn.Conv2d(128, 64, kernel_size = 3, stride = 1, padding = 1, bias = False), nn.BatchNorm2d(64), nn.ReLU(inplace = False) # batch_size * 64 * 256 * 256 ) self.decode = nn.Sequential( #흑백이미지와 노이즈를 다시 합쳐줌 # batch_size * (64 + 2) * 256 * 256 nn.Conv2d(66, 32, kernel_size = 3, stride = 1, padding = 1, bias = False), nn.BatchNorm2d(32), nn.ReLU(inplace = True), # batch_size * 32 * 256 * 256 nn.Conv2d(32, 3, kernel_size = 3, stride = 1, padding = 1, bias = False), nn.Sigmoid() # batch_size * 3 * 256 * 256 ) def forward(self, input): encoding = self.encode(input) decoding = self.decode(torch.cat([input,encoding], dim = 1)) return decoding | cs |
1 2 3 4 5 6 7 8 9 10 11 12 13 14 15 16 17 18 19 20 21 22 23 24 25 26 27 28 29 30 31 32 33 34 35 36 37 38 39 40 41 42 43 44 | class Discriminator(nn.Module): def __init__(self): super(Discriminator, self).__init__() self.main = nn.Sequential( #흑백이미지와 컬러이미지를 합쳐서 진행 # 4 * 256 * 256 nn.Conv2d(4,8,kernel_size = 4, stride = 2, padding = 1, bias = False), nn.LeakyReLU(0.2, inplace = True), # 8 * 128 * 128 nn.Conv2d(8,16,kernel_size = 4, stride = 2, padding = 1, bias = False), nn.BatchNorm2d(16), nn.LeakyReLU(0.2, inplace = True), # 16 * 64 * 64 nn.Conv2d(16, 32, kernel_size = 4, stride = 2, padding = 1, bias = False), nn.BatchNorm2d(32), nn.LeakyReLU(0.2, inplace = True), # 32 * 32 * 32 nn.Conv2d(32, 64, kernel_size = 4, stride = 2, padding = 1, bias = False), nn.BatchNorm2d(64), nn.LeakyReLU(0.2, inplace = True), # 64 * 16 * 16 nn.Conv2d(64,32,kernel_size = 4, stride = 2, padding = 1 , bias = False), nn.BatchNorm2d(32), nn.LeakyReLU(0.2, inplace = True), # 32 * 8 * 8 nn.Conv2d(32,16,kernel_size = 4, stride = 2, padding = 1 , bias = False), nn.BatchNorm2d(16), nn.LeakyReLU(0.2, inplace = True), # 16 * 4 * 4 nn.Conv2d(16, 1, kernel_size = 4, stride = 1, padding = 0 , bias = False), nn.Sigmoid() ) def forward(self, input): output = self.main(input) """sigmoid로 가짜인지 진짜인지의 확률값으로 반환.""" return output.view(-1,1).squeeze(1) | cs |
이렇게 Generator 와 Discriminator 이다.
Generator 는 maxpool을 통해서 encoding 작업을하고 upsampling으로 decoding 하면서 3 * 64 * 64 Color이미지를 생성해내는 방식이다.
그리고 Discriminator는 input이 Real 인지 Fake인지를 판별하는 작업을 하기위해서 Conv레이어를 거치면서 마지막은 batch_size만큼 의 output을 내며 sigmoid로 Real 인지 Fake 인지를 (0,1) 범위의 확률값을 return한다.
하지만 이방법 또한 실패했다

왜냐하면 위의 사진처럼 노이즈만 가득한 사진이 나오기 때문이다 ㅠㅠ
문제점을 나름 생각해 보았을땐, 이미지 크기가 256으로 커서 학습이 함들었을수도 있고 , Generator에서 마지막 decode과정에서 다시 input을 합쳐준 부분이 조금 에러가 아니었나 싶다...
그래서 아예 새로운 모델을 다시 만들었다.
열심히 구글링하고, 예제코드도 보고 참고해서 다시 만들어낸
두번째 모델이다.
1 2 3 4 5 6 7 8 9 10 11 12 13 14 15 16 17 18 19 20 21 22 23 24 25 26 27 28 29 30 31 32 33 34 35 36 37 38 39 40 41 42 43 44 45 46 47 48 49 50 51 52 53 54 55 56 57 58 59 60 61 62 63 64 65 66 67 68 69 70 71 72 73 74 | class Generator(nn.Module): def __init__(self): super(Generator, self).__init__() """noise image + gray image""" # batch_size * 2 * 64 * 64 self.conv1 = nn.Sequential( nn.Conv2d(2, 64, 4, 2, 1), nn.BatchNorm2d(64), nn.LeakyReLU(0.1) ) # batch_size * 64 * 32 * 32 self.conv2 = nn.Sequential( nn.Conv2d(64, 64 * 2 , 4, 2, 1), nn.BatchNorm2d(64 * 2), nn.LeakyReLU(0.1) ) # batch_size * (64*2) * 16 * 16 self.conv3 = nn.Sequential( nn.Conv2d(64*2, 64 * 4, 4, 2, 1), nn.BatchNorm2d(64 * 4), nn.LeakyReLU(0.1) ) # batch_size * (64 * 4) * 8 * 8 self.conv4 = nn.Sequential( nn.Conv2d(64 * 4, 64 * 8, 8, 1, 0), nn.BatchNorm2d(64 * 8), nn.LeakyReLU(0.1) ) # batch_size * (64 * 8) * 1 * 1 self.fc = nn.ConvTranspose2d(64 * 8, 64 * 8, 4, 1, 0) # batch_size * (64 * 8) * 8 * 8 self.upsample1 = nn.Sequential( nn.ConvTranspose2d(64 * 8, 64 * 4, 4, 2, 1), nn.BatchNorm2d(64 * 4), nn.LeakyReLU(0.1) ) # batch_size * (64 * 4) * 16 * 16 self.upsample2 = nn.Sequential( nn.ConvTranspose2d(64 * 4, 64 * 2, 4, 2, 1), nn.BatchNorm2d(64 * 2), nn.LeakyReLU(0.1) ) # batch_size * (64 * 2) * 32 * 32 self.upsample3 = nn.Sequential( nn.ConvTranspose2d(64 * 2, 64 * 1, 4, 2, 1), nn.BatchNorm2d(64 *1 ), nn.LeakyReLU(0.1) ) # batch_size * 64 * 64 * 64 self.upsample4 = nn.Sequential( nn.ConvTranspose2d(64, 3, 4, 2, 1), nn.Tanh() ) def forward(self, input): output = self.conv1(input) output = self.conv2(output) output = self.conv3(output) output = self.conv4(output) output = self.fc(output) output = self.upsample1(output) output = self.upsample2(output) output = self.upsample3(output) output = self.upsample4(output) return output | cs |
1 2 3 4 5 6 7 8 9 10 11 12 13 14 15 16 17 18 19 20 21 22 23 24 25 26 27 28 29 30 31 32 33 34 35 36 37 38 39 | class Discriminator(nn.Module): def __init__(self): super(Discriminator, self).__init__() self.main = nn.Sequential( #""" color imgage (fake or real image)""" # 3 * 64 * 64 nn.Conv2d(3,64,kernel_size = 4, stride = 2, padding = 1, bias = False), nn.LeakyReLU(0.2, inplace = True), # 64 * 32 * 32 nn.Conv2d(64,128,kernel_size = 4, stride = 2, padding = 1, bias = False), nn.BatchNorm2d(128), nn.LeakyReLU(0.2, inplace = True), # 128 * 16 * 16 nn.Conv2d(128, 256, kernel_size = 4, stride = 2, padding = 1, bias = False), nn.BatchNorm2d(256), nn.LeakyReLU(0.2, inplace = True), # 256 * 8 * 8 nn.Conv2d(256, 512, kernel_size = 4, stride = 2, padding = 1, bias = False), nn.BatchNorm2d(512), nn.LeakyReLU(0.2, inplace = True), # # 512 * 4 * 4 # nn.Conv2d(512, 1, kernel_size = 4, stride = 1, padding = 0 , bias = False) # #nn.Sigmoid() ) self.fc = nn.Sequential( nn.Linear(512*4*4 , batch_size), nn.Sigmoid() ) def forward(self, input, b_size): output = self.main(input) output = self.fc(output.view(b_size,-1)) return output.squeeze() | cs |
이렇게 Generator 와 Discriminator를 만들었다.
input 은 batchsize * 2 * 64 * 64 로 256크기였던 이미지를 64로 줄여버렸고, batchsize를 16으로 늘렸다.
Discriminator는 전에것과 별로 다르진 않은데 마지막을 FC레이어를 붙여주어 각각에대해 확률값을 뽑아내도록 만들었다.
Generator는 conv Layer를 거치면서 압축시켜나가고 , 이번에는 upsampling이 아닌 deconv를 통해서 이미지를 color 이미지로 다시 복원시켜 나간다.


이렇게 결과가 나왔다.
일단 여러번의 실패 끝에 그럴듯한 모습으로 학습을 해 나가는 모습에 너무 좋았다.
하지만 위의 결과에서 보듯이 처음엔 학습을 해 나가는 듯 하지만, 형태를 좀처럼 알아 볼 수가 없다.
사용한 이미지들은 개, 고양이 사진들인데 언뜻보면 개, 고양이의 형태를 띠는 이미지들이 몇 있긴하다. 하지만 Genertor loss가 줄어들지 않았고, 계속 비슷한 이미지들만 나왔다.
어찌되었던 , 중반부 부터는 학습이 진행되지 않는것 같았다.
아마도 Generator에서 흑백 이미지를 압축 했다가 deconv하는 과정에서 원래의 모양을 잃어버리는 것 같았다.
왜냐면 위에는 일부의 결과들만 있지만 다른 결과들을 보면 분명 고양이거나 개인건 알겠는데 모양이 많이 일그러져 있는 이미지들이 생각보다 많았기 때문이다.
내가 놓치고 있는 부분이 많을것 같다. 다시 공부를 좀 더 해보고 모델을 다시 만들어야겠다.
세번째 시도
Discriminator는 변한게 없으니 일단 놔두고 Generator 만 보자
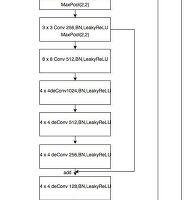
1 2 3 4 5 6 7 8 9 10 11 12 13 14 15 16 17 | def forward(self, input): output1 = self.conv1(input) pool1 = self.maxpool(output1) output2 = self.conv2(pool1) pool2 = self.maxpool(output2) output3 = self.conv3(pool2) pool3 = self.maxpool(output3) output4 = self.conv4(pool3) output5 = self.fc(output4) output6 = self.upsample1(output5) output7 = self.upsample2(output6) + output3 output8 = self.upsample3(output7) + output2 output9 = self.upsample4(output8) + output1 output10 = self.conv1by1(output9) out = self.conv(output10) return out | cs |
Generator도 많이 바뀌진 않았는데, 이전의 모델에서 학습을하면서 이미지를 줄이고 다시 upsample하는 과정에서 흑백이미지의 형태를 잃어버리는 것 같았다. 그래서 그 형태를 잃어버리지 않도록 크기를 조금 변형해 주고, conv layer의 output을 upsample의 output에 더해주었다.
아이디어는 GAN에대해서 알아보다가 U-NET 의 모델 형태를 보고 이렇게 적용시키면 될 것 같았다. (U-NET 은 뭔지 모른다.. 이거다하고 공부해 봐야겠다.)
모양새는

이런 모양이였다. encode 의 결과를 다시 decode 할때 붙여주어 원래형태를 잊지 않도록 하는 모습인 것 같았다.(아닐수도 ..)
(u-net 은 concat으로 붙여준다고 하는데 concat도 한번 해봐야겠다. )
결과는 생각보다 훨씬 만족스러운 결과였다.


이제는 누가봐도 개와 고양이인것을 알 수 있다. 게다가 colorize도 잘 하고 있는 모습을 보여주고 있다.
하지만 아직도 뭔가 2% 부족한 느낌이라.. 조금더 바꾸어 보아야겠다.
GAN에대한 공부내용은 이것부터 완성시키고 정리해서 올려야 겠다.
혹시나 미흡한 결과이지만 전체 코드를 보고싶다면
제 github오시면 보실 수 있습니다.
'AI > Pytorch' 카테고리의 다른 글
| PyTorch에서 발생하는 ‘expected scalar type Float but found Double’ 에러 해결 (0) | 2025.04.06 |
|---|---|
| [Pytorch] GAN 을 이용한 Black & White image Colorization 최종 (0) | 2018.04.06 |
| [pytorch] RNN seq2seq 간단한 대화모델 (8) | 2018.02.09 |
| [pytorch] RNN seq2seq 를 이용한 translater (2) | 2018.02.02 |
| [Pytorch] kaggle cat vs dog 학습시키기 with Resnet (0) | 2018.01.24 |